
Data conversion in Power Apps – Table to string
In this new blog series, I will show you how to do data conversions from one data type to another.
This blog will show you how to convert a table to a string and vice versa.
Table
First of all, let’s quickly jump into the definition of a table. According to Wikipedia:
In Power Apps, you can define a table for yourself (by using the ClearCollect(), Collect(), or Table() function) or you can just load a pre-defined table into your Power App (such as a SharePoint list).
ClearCollect(
    colTable,
    {ID: 1,Title: "First item"},
    {ID: 2,Title: "Second item"},
    {ID: 3,Title: "Third item"}
)
This function will create a table with 2 columns: ID and Title and 3 rows (records or items), which is basically the same as the SharePoint list as shows below:

If you put these tables into a Table control in Power Apps, you will get the same result:

Converting the data
For the data conversion, it doesn’t really matter if you use a self created table or a pre-defined table. The syntax is the same for both. In this blog, I will just process the self-created table.
Table to string (single-column)
The function for converting a table to string is the Concat() function. This function expects the following properties to be used:
Concat(Table,Formula,Separator)- Table: This is the name of your table
- Formula: This is often just the column you want to extract
- Separator: This is the separator you want to use to separate each record from one other
With that in mind, if you want to convert the table generated earlier into a string, using only the Title column, your formula should be as follows:
Set(
    varString,
    Concat(
        colTable,
        Title,
        ";"
    )
)
Please note that I’m putting the output of the Concat() formula into a variable (varString) so that I can easily re-use it elsewhere within my Power App. If I put that variable into a label, the result will be as follows:
![]()
I used a semicolon as separator, but you can use whatever string you want to use as a separator. You can even use complete sentences if you want to.
Filtering out duplicates
In some cases, you may find duplicate values within your table you may want to filter out. This can be done by using the Distinct() function. So let’s say I have a fourth item in my table:

When I run the above formula, the result will be as follows:
![]()
I don’t want that second Third item to appear in my result, so I need to alter my formula a bit, using the Distinct() function:
Set(
    varString,
    Concat(
        Distinct(
            colTable,
            Title
        ),
        Result,
        ";"
    )
)
Please note that the Table and Formula properties have altered. The Distinct function has replaced the Table property and the Result has replaced the Formula property:
- Distinct
- colTable: This is the table from where you want to filter out the duplicate values
- Title: This is the column you want to check for duplicate values
- Result: This now is the column you want to pass through to your string. Since the Distinct function does not return the column name, you have to use the Result property for this instead of the actual column name
When I run this new formula, the result will be as follows:
![]()
Table to string (multi-column)
As shown in the previous example, you can easily convert your table into a string, using only 1 column from your table. But what if you want to have more columns included into your string? That’s not a problem as well, you just need to modify the formula a bit, so you can include multiple columns.
Set(
    varString,
    Concat(
        colTable,
        Concatenate(
            Text(ID),
            "|",
            Title
        ),
        ";"
    )
)
Please note the difference with the first Concat() function; instead of just pointing out the Title column of my table, I now combine multiple attributes using the Concatenate() function (which allows you to combine multiple values) within my Concat() function:
- Text(ID): This will add the ID column, but since the Concat() function only allows text types. Since the ID column is a number type, it needs to be converted into a string first, using the Text() function
- “|”: This will add a pipe between the first column and the second column. Again, you can use any separator you want for this, just like the separator inside the Concat() function.
- Title: This will add the Title column
If I put that variable into a label again, the result will be as follows:
![]()
String to table (single-column)
Where you can convert a table into a string, you can also do that the other way around. First, let’s look into the single-column string type. The Concat() function provided us with the following result:
First item;Second item;Third itemTo make sure a string can get processed back into an array, we must have a separator that we can use to determine the separate record. In this case, that would be the semicolon, but it can be any string.
The function to convert a string into a table is the Split() function. This function expects the following properties to be used:
Split(String,Separator)- String: This is the string you want to convert into a table
- Separator: This is the separator on which you want to split the values
With that in mind, you can convert the above string back into a table with the following formula:
Split(
    varString,
    ";"
)
Which will result in the following table control in Power Apps:

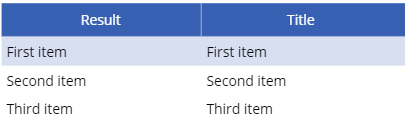
Please note that you don’t have a column header inside this table. It will just show as ‘Result’ because the Split() function doesn’t allow you to set a column header. If you do want to have a custom column header, you need to use the AddColumns() function to add another column to your table which has the same outcome as the Split() function:
AddColumns(
    Split(
        varString,
        ";"
    ),
    "Title",
    Result
)
This will add the Title column to your table, using the output from your Split() function (the Result column):
String to table (multi-column)
If you have multiple ‘columns’ in your string and you want to convert it back into a table, make sure that your records are separated (just like the single column string) and that your columns inside that records are separated too. In the previous example of converting the multi-column table into a string, that was the case: a semicolon for records separation and a pipe for column separation:
1|First item;2|Second item;3|Third itemThe basics of the conversion are the same as the AddColumns() variant used earlier, but if we use the same formula as above, we don’t get the table we want:
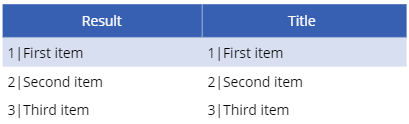
So we need to extend that formula a bit so that we can split the value from the Title column into the actual value corresponding to the Title column and we need to add another column that contains the ID (which is a numeric value). The separator between the ID and Title column is a pipe symbol, so we can split on that symbol to separate the columns:
AddColumns(
    Split(
        varString,
        ";"
    ),
    "ID",
    Value(
        First(
            Split(
                Result,
                "|"
            )
        ).Result
    ),
    "Title",
    Last(
        Split(
            Result,
            "|"
        )
    ).Result
)
Let’s break this bad-boy apart:
- The first Split() part we know already from the previous section; this is where we split the varString variable into single records by splitting on the semicolon.
- The AddColumns() function allows us to generate separate columns for our table. But instead of just using the Result from our first Split outcome like we used to determine our Title column, we now need to split that Result on the pipe separator to get both the ID and the Title column:
Split(Result,"|")Since this Split results into a table of its own, we need to use the First() and Last() function to make sure we get both columns back.
- ID: This is the first column given back from the Split() function, so we need to First() function for this to get the actual ID value (as Result). Since this is a numeric type, we need to convert it from text to a number by using the Value() function.
- Title: This is the last column given back from the Split() function, so we need to Last() function for this to get the actual Title value (as Result).
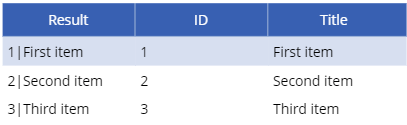
Loading this formula into the Power Apps table will give us the following result:
If you have more than two columns, you may need to use the FirstN() and/or LastN() function in combination with the First() or Last() function. I will not describe that in this blogpost, but if you need help with this, please reach out to me and I will try to help you out.
Final thoughts
Converting a table into a string can be extremely useful when sending data from one application to another where the receiving application or the data transfer method doesn’t support tables (e.g. when running a flow from a Power App).
Please note that formula’s can be a bit difficult to read in some cases, so make sure you always describe what your formula’s are doing (inside your technical documentation or within your Power App by using comments or comment blocks).