
How to configure long running approvals in Power Automate – Part 2 – Dataverse
This blog series will cover the long running approvals in Power Automate. I will describe how you can exceed the 30 day run limit.
This is part 2 of this blog series, which will cover a workaround using Dataverse.
Part 1 will cover a workaround using SharePoint.
Approvals and Dataverse
Approvals are built upon Dataverse, which makes it interesting to use this solution. It requires two solutions in the environment you are working in:
- Microsoft Flow Approvals
- Microsoft Flow Approvals Core Solution
The first solution doesn’t have any (visible) content. The second solution consists of multiple tables, a choice set and two security roles.
In order for this workaround to work, we need to use the following three tables within this solution:
- Approvals
- Approval Requests
- Approval Responses
Adding the solutions to your environment
When you haven’t used Approvals before, the solutions mentioned above don’t exist in your environment yet:

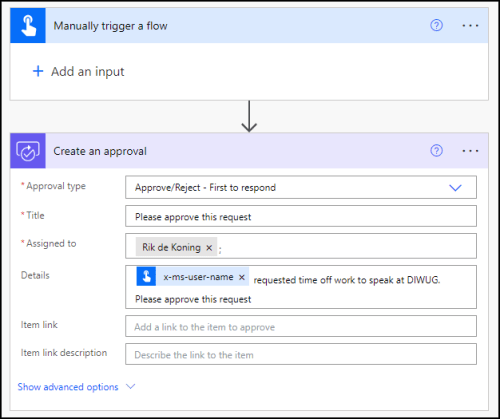
In order for them to appear, you need to have started at least one approval within your environment. The quickest way to have these solutions added is to create an instant flow with just one action: Create an approval:

When running this flow, the flow will try to create entries in the corresponding Approval tables. But since the solutions and tables don’t exist yet, the flow will automatically create them for you. The Flow checker will inform you about this as well when saving the flow:

During provisioning, the flow will wait with sending out the approval until the solutions have been created. That is why the first approval flow you run in your environment always takes a significant amount of time longer than any of the following approvals you will send out.
After the flow has been completed (it will not wait for a response in this example), the solutions and tables are created:

Please note that it does take a while for the provisioning to finish, so just sit back and relax while Microsoft is doing the work for you. You can see the difference in run time between the first run (where the solutions weren’t available yet) and the second run:

Having a closer look at the Approvals tables
Like mentioned before, there are multiple tables Microsoft Flow Approvals Core Solution solution, but we only need a few of these (highlighted below):
- Action Approval Model
- Approval
- Approval Request
- Approval Response
- Await All Action Approval Model
- Await All Approval Model
- Basic Approval Model Data
- Flow Approval
- Team
- User
The Approval table contains the basic information (such as dates, details, assignees, status, etc.) of each approval that has been sent out.
The Approval Request table contains all information (such as response options, reassignment information, etc.) of each approval request that has been sent out. This means that for every assignee / approver you have provided in your approval, an item will be created in this table. So there can be more items in this table than there are in the Approval table.
The Approval Response table contains details of each response (such as dates, response option, responder etc.) that has been given to an approval. This table will only be populated after a response has been given. So when an approval is still awaiting response, there will be no items in this table related to that approval.
Also, when you’ve configured your approval to await all responses, the amount of items in this list related to this approval doesn’t match the number of approvers. So there can be less items in this table than there are in the Approval / Approval Request table.
The other tables are system tables that are being used to make sure approvals do what they need to do, but don’t contain any useful information about a single approval.
Bypassing the 30 day limit
As mentioned in Part 1 of this blog series, an approval exists forever in Dataverse, so there is no real 30 day limit here. Now that we have a bit more understanding of the tables, we can actually see this inside the Approval and Approval Request tables:

Both tables contain a set of columns called Due On and Expires On and they both have a due/expiry date in the year 10,000. I won’t be living long enough to witness an approval expiring 🤗.
Flow setup
Just like in Part 1, we will be using a parent flow to send out the approval and a child flow to handle the outcome.

In this example we won’t be using the Approval Requests table. We will just be looking at the status of the approval in the Approval table, which is sufficient for the First to respond or Wait for all responses approval types.
If you want to do something with a certain percentage of people should approve, then the Approval Requests table may come in handy. This will not be handled in this blog post though.
Parent flow
The parent flow is pretty much the same as when you’re using the SharePoint workaround. The only difference here is that we won’t be creating an item in SharePoint which will trigger our Child flow.
Child flow
Unlike in Part 1, where the child flow gets triggered when a new item is created in the SharePoint list, this flow triggers on a new item in Dataverse; the Approval Response table. So we need a flow with the When a row is added, modified or deleted trigger using the Added Change type.
Within this flow, we need to get the corresponding item from the Approval table and check the status of that approval. We can do that by adding a Get a row by ID action, selecting the Approval table (plural name: Approvals) and selecting the Approval Id Index from the Dynamic Content for Row ID:

Now that we have the Approval details related to the response, we can check if the Approval has been completed by checking the status of the approval. Because we configured this approval to wait for the first response, it should be completed. But if you have multiple approvers, you need to make sure that you only proceed after the final response has been given.
For this, we add a Condition to our flow and select the Status (statecode) column from the Dynamic Content of the List rows action. This column determines whether a approval is Pending (using 0 as identifier) or Completed (using 1 as identifier). Because we want to check if the approval is completed, we fill in 1:

Now that we know that the approval has been completed, we can further built out our process in the Yes branch of our condition.
Besides knowing the status of the approval, we also want to know the final outcome of the approval of course. With this, you can determine if you should process the approved or rejected branch of your process. Or maybe a custom outcome you’ve provided by using the Custom reponse approval type.
This final outcome is stored in the Result column of your Approval table so you can use that in another Condition to further build out your flow. Please make sure that when you are using the default response options, the Result will give you either Approve or Reject, so not Approved or Rejected. When using a Custom response as Approval type, you should have the exact same response to check on.
I will not cover this any further, because every process is different. The basic configuration of this child flow on which you can built further should look like this:

Licensing
Because you’re using the Dataverse connector in your child flow, you will need a premium license for this. Whether this should be a per user, per app or consumption based is up to your scenario.
You can also use a Logic App for the child flow, even though Logic Apps doesn’t have an Approval connector. This is because you will query Dataverse, which is supported in a Logic App.
Considerations
Please keep in mind that in the configuration as shown in this blogpost, this will apply to each approval within your environment. So if you have multiple approval processes in a single environment, make sure that both follow the same process after approval. If that isn’t the case, you should do one of the following:
- Separate the processes into different environments and create a parent/child flow construction for each process.
- Provide an identifier when you create an approval in your parent flow (e.g. a placeholder in the approval title or approval details) and make sure to use a filter in your child flow to only get the approval responses that match that identifier. Since the Microsoft Flow Approvals Core Solution is a managed solution that doesn’t allow modifications, it is not possible/advisable to add additional columns to your Approval table and put your identifier in there.
Conclusion
The Dataverse workaround is more reliable than the SharePoint workaround because you are not dealing with a 1-15 minute gap in which your response can get lost.
Your flow also isn’t waiting constantly for the outcome. If you have a long running process that might take up to 1 year, this means that the SharePoint workaround can have up to 13 flow runs before the process is completed. With this workaround, you only have 1 run instance of your child flow because it only gets triggered when needed.
It does come with an additional license, but if you’re using business critical approval processes, that shouldn’t stop you from using this. Whether it be in Power Automate or in Logic Apps is up to you, but a reliable process is worth the extra costs that comes with it.
One Reply to “How to configure long running approvals in Power Automate – Part 2 – Dataverse”
Thank you for this informative and detailed Part 2 of the long-running approvals in Power Automate series using Dataverse. It’s great to see how you’ve continued to explore workarounds for this common challenge in Microsoft Flow.