
Checking out and updating items in another Site with SharePoint 2013 Workflow and the REST API
Last year, my colleague Django wrote about creating items in another Site (Collection) with a workflow by using a Call HTTP Web Service action.
I want to take this case a bit further and explain how to (bulk) update items in another Site, especially when that items need to be checked out before they can be edited.
The case
A company I was working for had implemented a system where audits could be started. When an item was created in a list (at root level), an Audit site would be automatically created. People then could start working on that specific audit.
One of the features of the audit site is that they could create Findings (which was a page with a custom Content Type with specific metadata and a custom page layout) for that specific audit. One of the metadata fields on that Findings page was ‘Finding Status’ which was a Managed Metadata field. The default value of this field was ‘Draft’.
When an audit was completed, a workflow was triggered manually to close the audit site. The only thing they were missing was that the status of every Finding on that specific audit site had to be changed from ‘Draft’ to ‘Open’ so that they could start working on the findings for the specific audit.
This had to be implemented in the existing SharePoint Designer 2013 workflow for closing the audit site.
The struggles
I needed to get all findings for the specific audit site, but SharePoint Designer 2013 workflow does not provide an out-of-the-box action to get multiple items from a specific location based on certain criteria and store them somewhere. It also does not have a for each loop action to easily iterate through a specific set of items. Both actions can be achieved by using a third-party workflow solution like Nintex Workflow, but this was not an option.
Another struggle was that Finding Status field that needed to be updated was a Managed Metadata field, which is always a deal breaker within workflows (should I use the term text value, should I use the term ID or should I use both…).
Another thing I came across was that when I thought I finally had the workflow configured correctly and I ran it for the first time, nothing happened. No Findings were updated although the workflow did find them. There were no workflow errors, so I started wondering why the Findings weren’t updated. Eventually I found out that it had to do with the fact that the Findings (pages) had to be checked out before making any changes. So, I had to find a way to check out the Finding before updating it.
The solution

As you can see in the flowchart above, we need to configure five ‘custom workflow action sets’:
- Get all findings
- For each finding (which needed to be configured as an action set)
- Check out finding
- Update finding
- Check in finding
Each ‘custom workflow action set’ must be configured using the Call HTTP Web Service action, just like my colleague Django used in his article.
The entire workflow looks like this:

In the following sections, the workflow is broken down into the five ‘custom workflow action sets’.
Get all findings
To get all findings, a REST API URL must be called, which is in the following format:
https://<siteurl>/_api/lists/getbytitle('<listname>')/itemsAs you can see, two parameters are used:
- Site URL
- List Name
Since the workflow runs on root level, we cannot use the ‘Workflow Context: Current Site URL’ property for the Site URL.

Fortunately, the list item on which the workflow would run had a custom metadata field which contained the Site URL (‘Audit Url’) which we can use.
As I mentioned before, a Finding is a page with a custom Content Type with specific metadata and a custom page layout and is always located inside the same list: ‘Pages’.
So, the List and list items REST API URL we need to call to get all Findings is:
[%Current Item: Audit Url %]/_api/lists/getbytitle('Pages')/itemsCalling this API will give us all items inside the Pages list with all metadata, which isn’t what we want. We only want to get Findings (which had a custom Content Type: ‘Finding’) and we only want to get the metadata we need to minimize data pollution in the response we will get. So, we must provide the API with a selection of the metadata we want and a filter of the Content Type we need:
[%Current Item: Audit Url%]/_api/lists/getbytitle('Pages')/items?$select=kff18fda4f1941c2b22723d37264a3ab,Id,ServerUrl&$filter=ContentType eq 'Finding'– kff18fda4f1941c2b22723d37264a3ab is the ‘Name’ attribute (you can’t use the Display Name attribute) of the ‘Finding Status_0’ field (which is the hidden Text field for the actual Managed Metadata field)
– Id is the ‘Name’ attribute of the List Item Id which we need to update the item
– ServerUrl is the ‘Name’ attribute of the Relative Server URL which we need to check the item out and in again
I stored this REST API URL in a String variable named ‘findingsRequestUrl’.

For the API call, we need a Dictionary for the Request Header of the REST API call. In this case, we need two headers: Accept and Content-Type. The Accept header tells the server what your client wants in the response. he Content-Type header tells the server what the client sends in the request.
I created a Dictionary variable called ‘requestHeadersGet’:
![]()
Both response and request use the same headers:
application/json;odata=verbose
The next step was to call this API to get all Findings with the Call HTTP Web Service action.
Make sure you use an App Step to perform these kinds of actions to avoid permission based errors. Django has described this in his article.
This action asks you to fill in the following properties:
- ‘Address’ which is the REST API URL that should be called. In this case, it is the variable that has been created above: ‘findingsRequestUrl’
- ‘RequestType’ which is in this case a HTTP GET because we want to get something back from the call
- ‘RequestHeaders’ are the headers used for the call. In this case, it is the variable ‘’ that has been created above: ‘requestHeadersGet’.
- ‘RequestContent’ is not needed for this call.
- ‘ResponseContent’ is where the response from the call will be stored. I created a new Dictionary variable for this: ‘findingsReponseGet’.
- ‘ResponseHeaders’ is not needed for this call.
- ‘ResponseStatusCode’ is where the response status code (eg. 400 for a HTTP400 request). This may come in handy for troubleshooting. This String variable is created automatically for you.
The final Call HTTP Web Service action for getting the Findings was configured as follows:


To get the results from the ‘findingsReponseGet’ dictionary, we must use an action called ‘Get an Item from a Dictionary’, pull ‘d/results’ from ‘findingsReponseGet’ and store them into a new Dictionary which I called findings.
![]()
For each finding (which needed to be configured as an action)
We now have all Findings that we need, but these cannot be updated in bulk. You must go through each one of them and individually update them one after another.
As I mentioned before, SharePoint Designer does not know an out-of-the-box solution for a for each loop, so to achieve this, we need to count how many items we got back from our previous call and use a loop action to run a set of actions that exact times.
First, you must count how many items are present within your findings Dictionary by using the ‘Count Item in a Dictionary’ action. The result will automatically be stored in the ‘count’ Integer variable.
You only want to proceed if there are items found. You can use a condition to check if the count variable is greater than 0.
After that, you can configure your Loop action to run as much times as your count variable.

To do a complete loop of all items found, we must use an index with our result set.
The first item is always index 0 in the result set so we can use a variable for this value. I used an Integer variable called ‘findingsIndex’ and used the ‘Set Workflow Variable action’ to set this variable to 0.
This action should be placed before the Loop action!

The loop will now run only on the first item in the result set, so we must increase the index at the end of each loop run. This can be done by using the ‘Do Calculation’ action by adding 1 to the ‘findingsIndex’ and storing it into a new variable which I called ‘findingsIndexPlusOne’. Since the outcome of calculations can only be stored in decimal type variables, we cannot store the outcome directly into the ‘findingsIndex’ variable (because this is an Integer variable). We must add an additional ‘Set Workflow Variable’ action where we set ‘findingsIndex’ to the value of ‘findingsIndexPlusOne’.

Check out finding
We can now loop through each one of our Findings so now we can proceed by modifying the Findings.
First, we need to extract the Finding from our set of findings by using the ‘Get an Item from a Dictionary’ within our loop and pull d/results() from our ‘findingsResponseGet’ Dictionary and store the result inside a new Dictionary variable which I called ‘finding’.

We now have our set of data for our current Finding within the loop and can proceed by updating the Finding, but we don’t want to update all Findings; we only have to update Findings from ‘Draft’ to ‘Open’ so we should check the ‘Finding Status’ field first.
To get metadata from your result set, you can use the ‘Get an Item from a Dictionary’ and extract the Name attribute of your field from the result set we were provided with in the previous step. In this case, ‘Finding Status’ is the display name of the field. The Name of the field is ‘kff18fda4f1941c2b22723d37264a3ab’. I stored the value inside a String variable called ‘FindingStatus’.
![]()
Note: It is also possible to directly extract the metadata from the entire set (findingsResponseGet) by using the above steps combined:

For now, I will continue using separate result sets.
We can now check the status of the finding. Since ‘Finding Status’ is a Managed Metadata field and we use the connected Hidden text field, the value is a combination of its Text and its ID (eg. the response value for the term ‘Open’ in my case was ‘Open|a77b9af2-a53c-49d4-ae10-75fe5429a813’). We cannot check for an exact match, but we can check if the value contains ‘Draft’.
![]()
We must check the Finding out before we can make any changes. Because the finding is outside the web scope of our workflow, we must use another Call HTTP Web Service action to achieve this. The REST API URL for checking out an item is:
https://_api/web/GetFileByServerRelativeUrl(<relativeurl>/CheckOut()We already know the Site URL, which is the ‘Audit Url’ field. We now must get the Relative URL for the specific finding. To do this, we must extract the ‘ServerUrl’ property from our result by using the same method we used for getting ‘Finding Status’. The value will be stored inside a String variable called ‘findingRelativeUrl’.
![]()
We can now set up our REST API URL for checking out the Finding and store it in a String variable called ‘findingCheckOutUrl’

We can now call our REST API URL to check out the item. In this case, we only need the ‘Address’, the ‘RequestType’ and the ‘RequestHeaders’ properties to be filled in.
- ‘Address’ which is the API that should be called. In this case, it is the variable I created in the previous step: ‘findingCheckOutUrl’
- ‘RequestType’ which is in this case is a HTTP POST because we want to post something to the server
- ‘RequestHeaders’ is the same as used in the previous call: ‘requestHeaderGet’:
The final Call HTTP Web Service action for checking out the Finding was configured as follows:


Update finding
We can now update the ‘Finding Status’ field. Because the finding is outside the web scope of our workflow, we must use another Call HTTP Web Service action to achieve this.
The REST API URL for updating an item is:
https://<siteurl>/_api/web/lists/getbyTitle('<listname>')/Items(<itemid>)We already know the Site Url, which is the ‘Audit Url’ field and the List Name which is ‘Pages’. We now must get the Item ID for the specific finding. To do this, we must extract the ‘Id property from our result just like we did before for the ‘ServerUrl’ and the ‘kff18fda4f1941c2b22723d37264a3ab’ field. I stored the value inside a String variable called ‘findingId’.
![]()
We can now build our REST API URL. I used a String variable called ‘findingsPostUrl’.

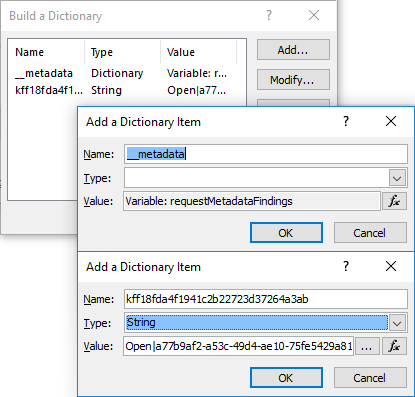
For the API call, we need a set of Dictionaries (like before) to update the Findings. I created the following Dictionary variables:

- ‘requestHeaders’ are the headers used for the call. In this case, we need more headers than we used before:
- ‘Accept’: application/json;odata=verbose
- ‘Content-Type’: application/json;odata=verbose
- ‘Content-Length’: 100
- ‘X-HTTP-Method’: MERGE
- If-Match: *

- ‘requestMetadataFindings’ determines the type of data that should be updated. In this case it is a Page which equals the ‘SP.Data.PagesItem’ type.

Note: You can find these types by browsing to following API and look for its ListItemEntityTypeFullName value:
https://<siteurl>/_api/lists/getbytitle('<listname>')?$select=ListItemEntityTypeFullName
- ‘requestDataOpen’ is the data used within the call request:
- ‘__metadata’ contains the ‘requestMetdataFindings’ variable we created above
- ‘<fieldname>’ which is the actual metadata we want to update the Finding with. In my case the Name property of the ‘Finding Status’ was ‘kff18fda4f1941c2b22723d37264a3ab’. Since this is the Managed Metadata hidden text field, we must provide the term value followed by its ID: Open|a77b9af2-a53c-49d4-ae10-75fe5429a813
We can now call the REST API URL to update the item. In this case, we need the ‘Address’, the ‘RequestType’ the ‘RequestHeaders’ and the ‘RequestContent’ properties to be filled in. These are the variables we created above.
The final Call HTTP Web Service action for getting the Findings was configured as follows:


Check in finding
The final step in completing this workflow is to check in the Finding after ‘Finding Status’ has been updated. This is almost identical to checking out an item.
The REST API for checking an item in is:
https://<siteurl>/_api/web/GetFileByServerRelativeUrl(<relativeurl> /CheckIn(comment='<comment>', checkintype=<type>)checkintype can contain the following values:
- 0: MinorCheckIn.
- 1: MajorCheckIn.
- 2: OverwriteCheckIn.
In my case I used ‘Automatic CheckIn by Workflow’ as a comment and checkintype 1.
We can now set up our REST API for checking in the Finding and store it in a String variable called ‘findingCheckInUrl’

We can now call our REST API to check the Finding in. In this case, we only need the ‘Address’, the ‘RequestType’ and the ‘RequestHeaders’ properties to be filled in.
- ‘Address’ which is the API that should be called. In this case, it is the variable I created in the previous step: ‘findingCheckInUrl’
- ‘RequestType’ which is in this case is a HTTP POST because we want to post something to the server
- ‘RequestHeaders’ is the same as used in the check out call: ‘requestHeaderGet’:
The final Call HTTP Web Service action for checking in the Finding was configured as follows:

